Log cabin videos plus summerhouse and garden office videos (including installations and final walk-around videos of completed buildings)
This page contains our full library of log cabin videos. It shows a whole range of things that may help you either decide on what building you require. Including actual construction videos and further videos of more specific things that you may find interesting.
We sell a whole range of different buildings, so we have sub-divided this page into different sections as follows……
- Section 1 = Installation videos of Hortons log cabins (single skin and Twinskin)
- Section 2 = Walkaround of completed Hortons log cabins
- Section 3 = Hortons Easibuild framed buildings (garden offices,sheds, workshops and garages)
- Section 4 = Lugarde summerhouses
- Section 5 = Bertsch Holbau pergolas and gazebos
- Section 6 = Miscellaneous items to help you build and maintain your garden building
Section 1 (timelapse videos of the installation of Hortons log cabins)
If you are going to build one of our log cabins. Please view these videos in conjunction with our log cabin installation guide
- Log cabin videos of a Twinskin Basildon 7.5m wide x 4.5m deep log cabin. A concrete base, as shown here, is best including our damp proof membrane (DPM) kit. Plus our Kingspan insulation kit to the roof, walls and floor. This gives all round insulation making it usable throughout the year – ideal for a warm garden office. Click here to view prices and available options for this large log cabin.
1 minute (really quick) version –
OR this is the longer version (9 minutes) so you can see more detail –
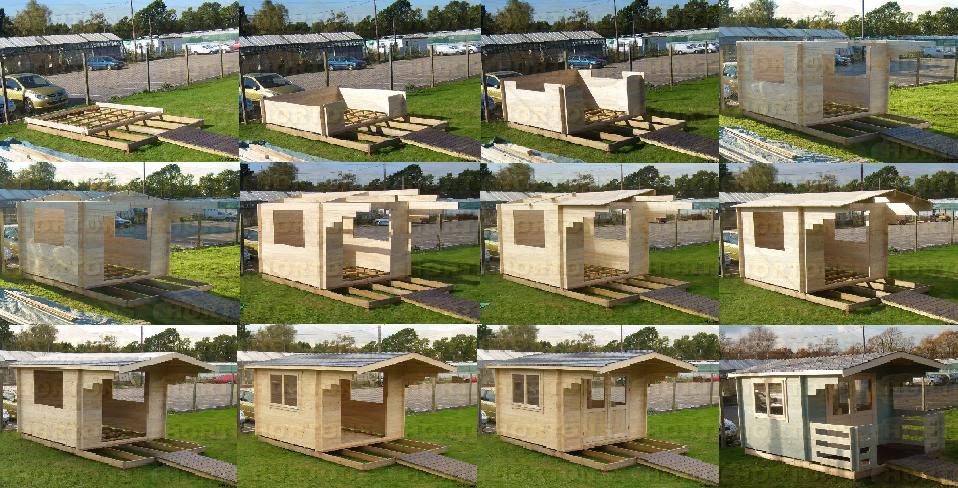
- Single skin 35mm 4m wide x 12m deep large log cabin with 3 rooms. The video shows the building of this cabin in our display ground near Horsham, West Sussex. This log cabin assembly video of the Stroud log cabin shows just how easy our log cabins are to build. Nearly all the parts are ready to just slot in (for the walls) or fix (roof & floor). With just a few items that need cutting on site (skirting boards, fascia & barge boards). Click here to view prices and available options for this large log cabin.
- Installation of our Twinskin Maidstone 4x4m log cabin onto a concrete base previously laid by our customer. Fibreglass insulation kit for the roof, walls and floor for all round insulation. Therefore making it usable throughout the year. Click here to view prices and available options for this 4×4 log cabin.
Section 2 (Hortons log cabins)
- Our showground 35+35mm insulated Twin Skin 7.5m x 4.5m pent roof Basildon log cabin. All house quality ISO windows, factory painted and EPDM maintenance free roofing. Click here to view prices and available options for this big insulated garden log cabin.
- Finished Hortons Basildon 8.5m x 4.5m log cabin. Our customer didn’t need any of the standard side windows, all double glazed and felt shingles. Click here to view prices and available options for this large garden cabin.
- Finished Hortons fully insulated custom 8.5m x 6.5m twinskin log cabin classroom. This building fully complies with UK building regulations. For structural and insulation values (roof, walls, floor and double glazing) for habitation. It therefore easily passes for use as a classroom. Click here to view prices and available options for our range of insulated log cabin classrooms.
More log cabin videos
- The Annie 3×3 log cabin is a long term favourite small cabin in our range. We are experts in designing modified or custom cabins to suit your requirements. We can change it to any design, shape and size. This one had the standard side wall double windows changed to pairs of taller single windows. Click here to generate your insulated garden office quote including many different options .
- This is a custom 4x7m Bath Twin Skin cabin with 2 rooms. We can modify or supply totally custom cabins to suit your requirements. This one had the standard front window deepened to 1480mm high (from 1230mm high). The side wall has an extra pair of double doors and another taller window. This replaced the 2 standard 1230mm high windows normally in this cabin. Click here to generate your own 2 room garden office quote including many different options .
- This is the Bamsley 5x6m 45mm single skin cabin with an insulated roof and floor. This one also had our damp proof membrane kit. Plus factory applied fire retardant paint. It is over 15sqm and within 1m of a boundary (as dictated by building regs). Click here to generate your own insulated garden office quote including many different options .
- The Watford 8.5m x 3.5m log cabin is a large cabin which has 2 rooms. It can also be 1 large room if required with just a structural archway required. Depending on which wall thickness you require, it measures less than 30 sqm internally. Therefore does not require building regs approval. Click here to generate a quote for various wall thicknesses and the many different options available.
- The Elgiva is a very popular 3m x 4m cabin. It is big enough for furniture or worktops if you want a hobby room or garden office. But small enough to fit into any size of garden without being overpowering. The model in the video is the 45mm wall version with insulated roof. And floor and upgraded windows (tilt & turn with 24mm thick double glazed units). Click here to price for a 3x4m cabin in various wall thicknesses and the many different options available.
- The Essex log cabin at 5.9m x 5.9m is just under 30sqm internally. It therefore doesn’t require building regulation approval. This customized version below has a pent roof no higher than 2.5m as well. Thus avoiding the need for planning permission. Click here to price for the Essex in various wall thicknesses and the many different options available.
- This is a modified version of our York log cabin. This cabin has 2 rooms instead of the standard single large room. This is as easy as clicking a button on the webpage to add a partition. The position of this can be anywhere within the cabin to suit you. Click here to see the York cabin prices in various wall thicknesses and the many different options available.
Section 3 (Hortons Easibuild framed buildings)
- This is the installation of our Easibuild cube garden office in our showsite from start to finish using timelapse. It’s modular construction make it very quick and easy. It is modular meaning that we can manufacture it to any design, shape and size. Click here to generate your own contemporary garden office quote including many different options .
- This is the video of the installation of our Easibuild Garden Room in our showsite from start to finish using timelapse. It’s modular construction make it very quick and easy. Because it is modular (like all Easibuilds), it means that we can make any design, shape or size. Click here to generate your own Garden Room quote including many different options .
- Our Easibuild heavy duty garden workshop shed is quite unlike any other sectional building you may have seen before. The construction is half height panels making it easy to lift as the panels are lighter. But it is still heavier than other so called extra strong workshops! This also means that you can easily take it through a house or garage if neccessary. These are all made to order to the nearest millimetre at no extra cost. Click here to generate your quote including many different options available for our strong workshops.
- Easibuild heavy duty garden workshop shed with a pent roof. It has house quality windows and doors to give it a summerhouse look and the warmth of a home office. This customer wanted to insulate and line the walls himself, hence the insulation boards stacked inside. Click here to generate your quote including many different options available for our strong workshops.
Section 4 (Lugarde summerhouses)
- 2 videos of the Lugarde PR17 summerhouse which has the feature bifolding doors. This is a very popular choice and always attracts customers walking around our showground.
- Video 1 is a timelapse of the construction process (installing in our showground)
- Video 2 is a walk around of the finished summerhouse.
- The Lugarde configurator link on our web page allows you to change the size and configuration to suit you, updating the price accordingly. Click here to open our PR17 summerhouse page and use the configurator to see the many different options .
- Lugarde 3m x 2.5m wooden gazebo with sliding glass front wall which you can open the building up when the weather allows. The roof is EPDM rubber roof. Click here to view prices and available options for this timber garden gazebo.
- Finished Lugarde 3.6m x 3m wooden gazebo with solid rear wall panels. This gazebo includes balustrading and a hipped roof covered with felt shingles. Click here to view prices and available options for this large wooden gazebo.
Section 2 (Bertsch Holbau gazebos)
- Bertsch Holzau Helena 3 – 5mx3.5m octagonal gazebo installation
Section 6 (Miscellaneous)
- How to remove / change / replace a pane of glass in a Hortons log cabin door
- How to reverse the door latch for Hortons Log Cabin door locks
- How to fit Hortons tilt & turn window handles (with hidden screw holes)
- How to fit Hortons double doors with sidelights
These log cabin videos are to help our customers understand the products that they show an interest in. Please bear in mind that we can modify, customise or change any aspect of any cabin to suit your requirements.
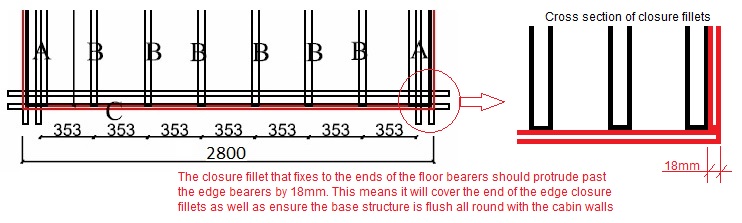 This plan shows a typical floor bearer layout for a cabin with an overall dimension of 3.0m – you should refer to your own set of plans for the exact layout of these for your cabin. If you have an insulated floor, a 19mm thick timber edging piece is supplied to fix along the ends of the bearers to close the ends off (there are no air voids with an insulated floor and therefore no ventilation is required). The interlocking wall log notch is typically set in by 0.1m from each log end, hence the base measuring 2.8m. Please note that the plan shows the spacing between each of the bearers as well as the width of the bearer on plan view. Floor bearers are always laid “flatways” in order to allow for the floorboards to be fitted at the end of the job as described later on. Please note that they are called floor bearers and not floor joists, this is because they are designed to be supported by a sub-base. They are not designed to take the full load and span from one side of the building to the other.It is good practice to lay a damp proof membrane (DPM) on top of your base before starting to install the building (we offer this as an option with our buildings). The DPM should be cut about 200mm larger than the base size required for the cabin , it can then be folded over on top of the floor bearers and trapped by the bearer trims supplied with our DPM kit to hold it in position (our floor bearers are pre-cut lengths to allow for this and the bearers should also be spaced such that they finish 20mm inside the wall face to allow for the trims when they are fitted, this then ensures that the DPM trims finish flush with the walls so they don’t trap water on top of them). This means that should water get on top of your base and under the building, the water will stay under the DPM rather than get on top of it, keeping all of the timber and insulation (if you have any within the floor structure) dry. If you do not have an insulated floor, ventilation holes can then be cut sufficiently above the base level, if required, to keep the standing water at bay (no ventilation required with a warm deck insulated floor). Please turn subtitles on when watching the following DPM installation video –

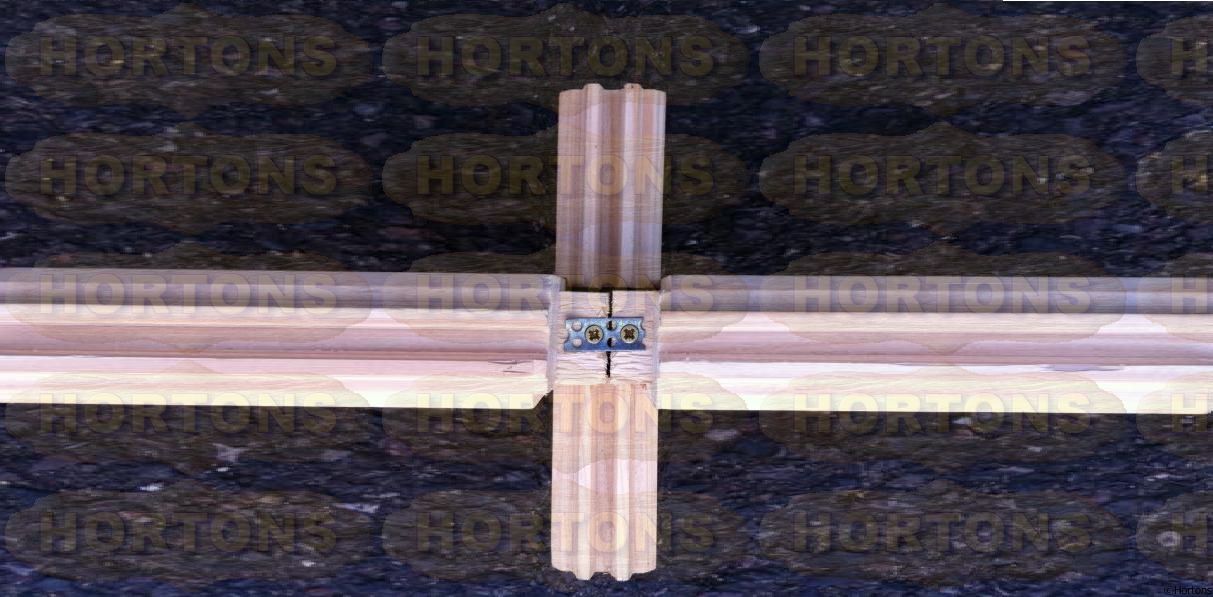 The logs are joined in the middle of a partition wall or portal archway. The metal plate is supplied in long lengths which can be cut to length on site with snips or hacksaw. The joining logs should be tightly clamped and then fixed using a screw through the metal plate either side of the joint which will stop the logs spreading in the future (these screws should be angled away from each other slightly as this will pull the joint together and also increases the pulling strength of the screws). Every course of logs should be joined in this way.
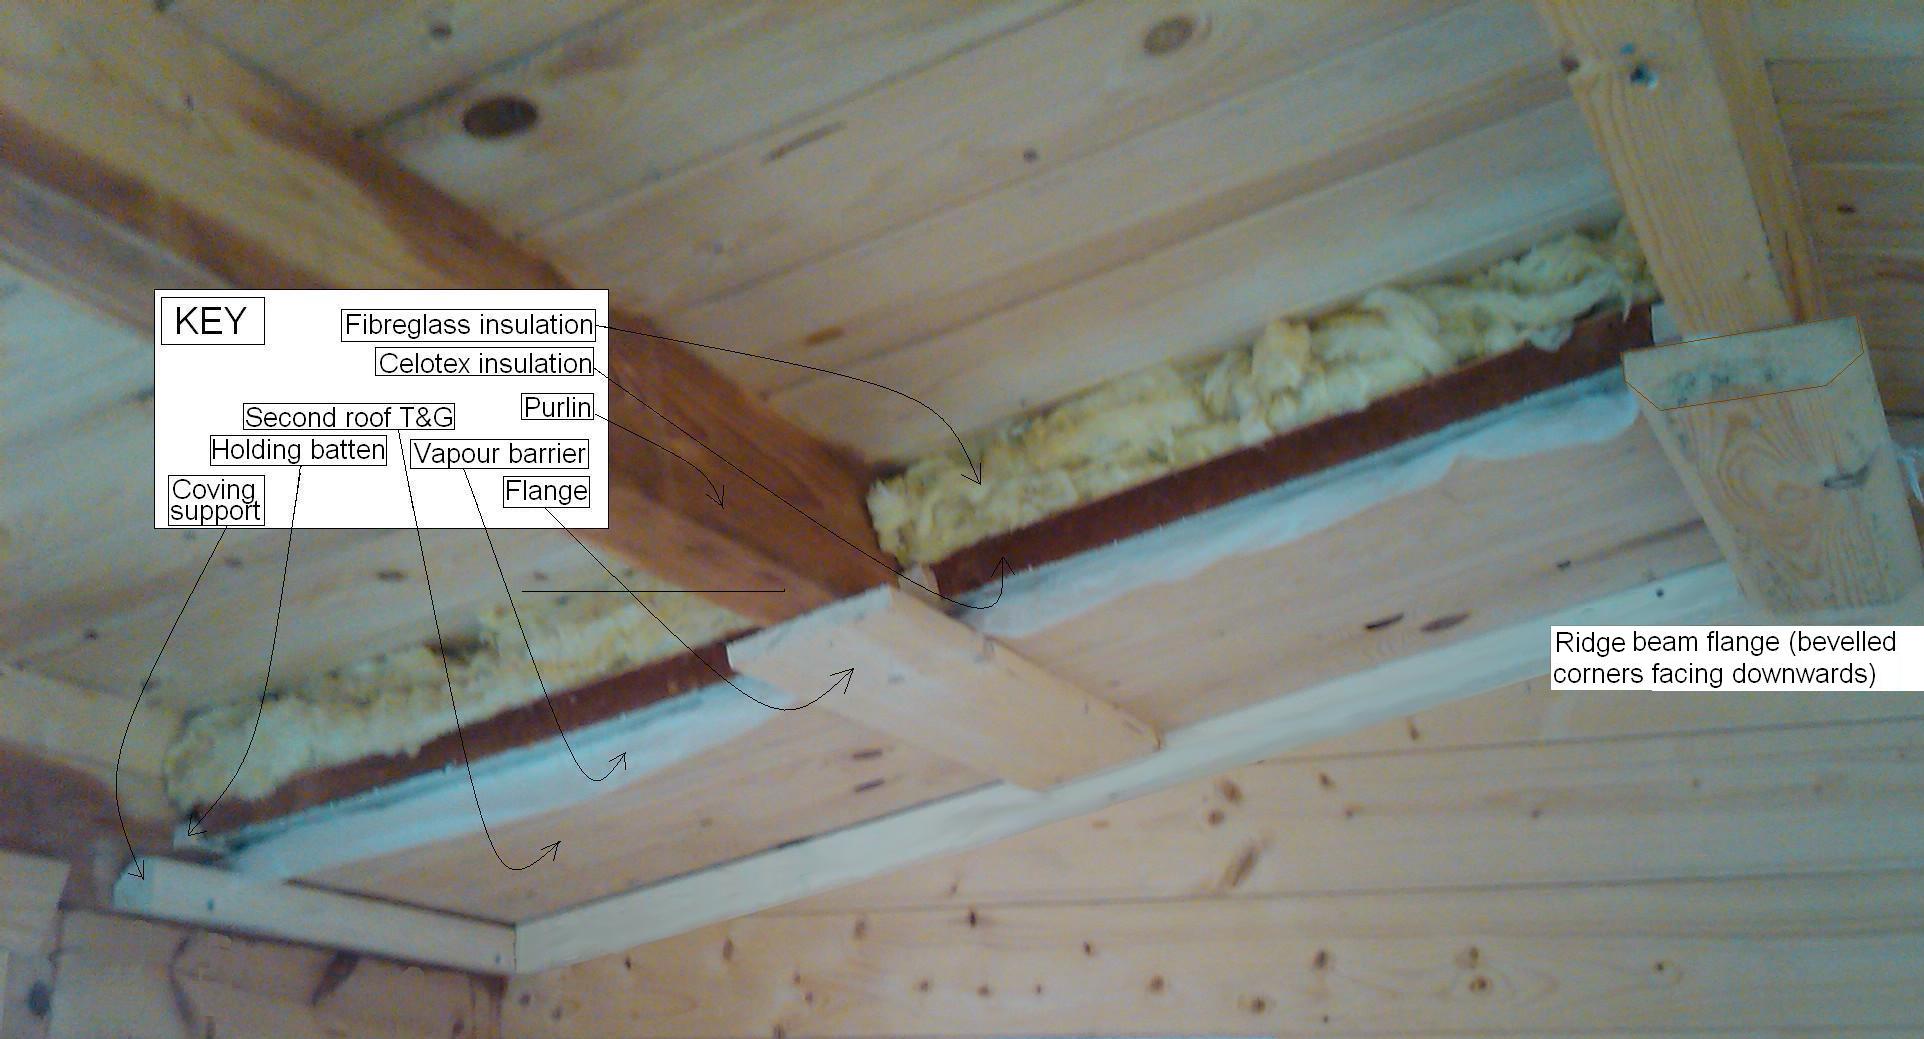
 AND (or can be a combination of both if required)
 If you are installing electric wires (ie lighting circuit), this is the perfect time to do this as there is full and easy access to all areas required within the roof void.
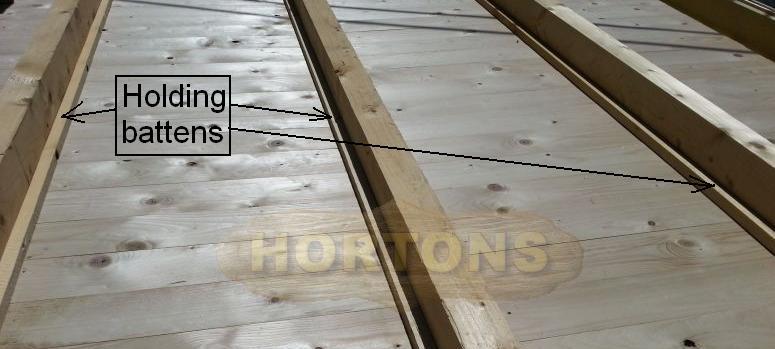
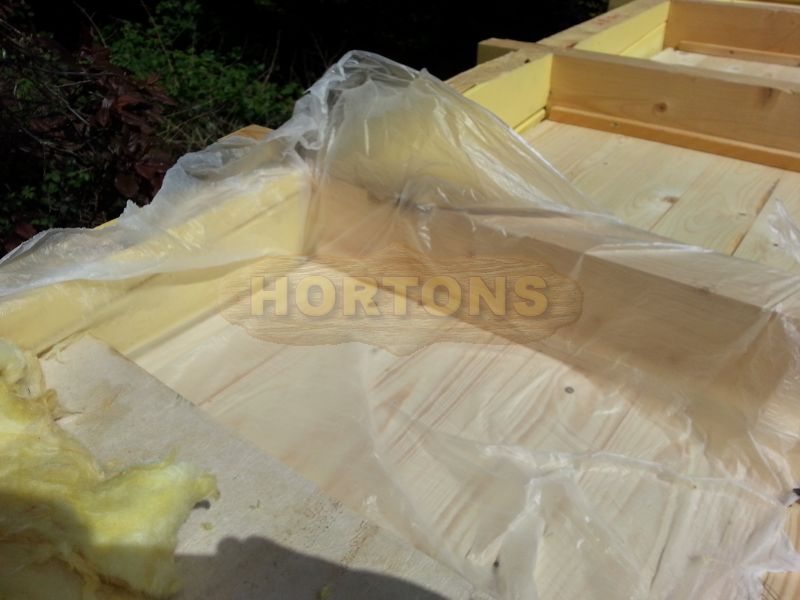 Insert your insulation into each bay, if you have a solid foam board and fibreglass loft roll combination mix, then lay the solid foam board in first (make sure it is a tight fit and sits tight against the ceiling boards), then lay the loftroll on top to fully fill the bay up to the top of the purlins. If you have the fibreglass only kit, the roof requires 2 layers of the loftroll to be rolled out (the fibrglass insulation kit also comes with 50mm thick slabs, these are for the floor, and walls if you have a twinskin cabin). This photo shows a cut-away version depicting the various layers-
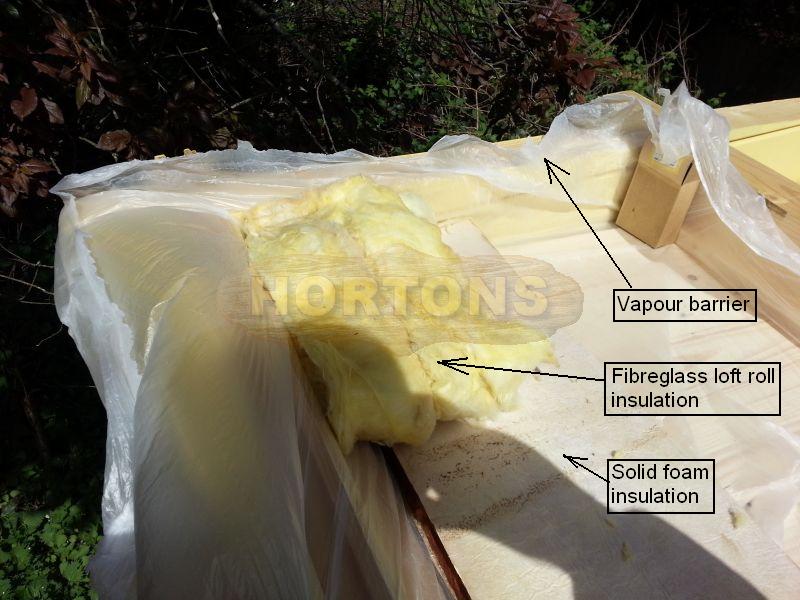
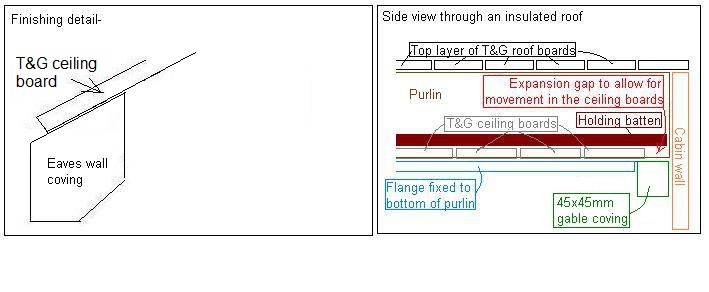
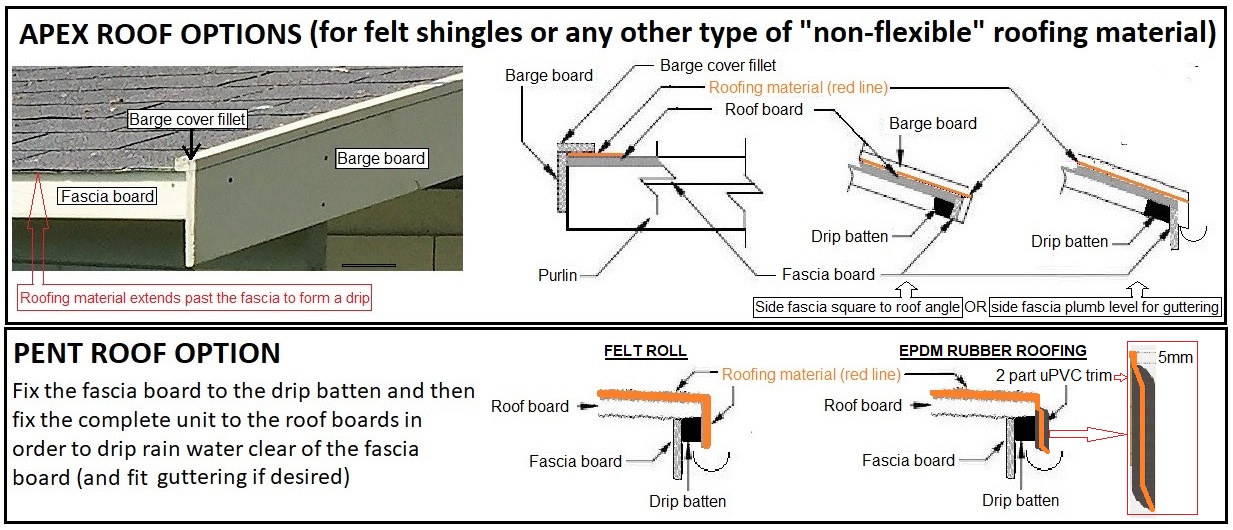 Once the roofing material (felt roll, felt shingles, etc) has been fitted, the barge boards (and fascias if felt roll) can be fitted which helps to hold the felt down. (Installation of other roofing materials, ie felt shingles / recycled rubber roof tiles / onduvilla, will vary slightly from the above method – please refer to the installation guide for that specific product if it is relevant). It is easiest to fit the barge cover fillet to the barge board (to form an upside down L shape) before fixing the complete barge unit to the roof. If you have double height barge boards (made of of 2 pieces of timber with a tongue & groove connection), then fit the upper L shaped piece first as just described, and then fit the lower piece afterwards.